-
목표
자바가 제공하는 제어문을 학습하세요.
학습할 것
선택문반복문
과제
과제 0. JUnit 5 학습하세요.
- 인텔리J, 이클립스, VS Code에서 JUnit 5로 테스트 코드 작성하는 방법에 익숙해 질 것.
과제 1. live-study 대시 보드를 만드는 코드를 작성하세요.
- 깃헙 이슈 1번부터 18번까지 댓글을 순회하며 댓글을 남긴 사용자를 체크할 것.
- 참여율을 계산하세요. 총 18회 중에 몇 %를 참여했는지 소숫점 두자리까지 보여줄 것.
- Github 자바 라이브러리 참고
- 깃헙 API를 익명으로 호출하는데 제한이 있기 때문에 본인의 깃헙 프로젝트에 이슈를 만들고 테스트를 하시면 더 자주 테스트할 수 있습니다.
과제 2. LinkedList를 구현하세요.
- LinkedList에 대해 공부하세요.
- 정수를 저장하는 ListNode 클래스를 구현하세요.
- ListNode add(ListNode head, ListNode nodeToAdd, int position)를 구현하세요.
- ListNode remove(ListNode head, int positionToRemove)를 구현하세요.
- boolean contains(ListNode head, ListNode nodeTocheck)를 구현하세요.
과제 3. Stack을 구현하세요.
- int 배열을 사용해서 정수를 저장하는 Stack을 구현하세요.
- void push(int data)를 구현하세요.
- int pop()을 구현하세요.
과제 4. 앞서 만든 ListNode를 사용해서 Stack을 구현하세요.
- ListNode head를 가지고 있는 ListNodeStack 클래스를 구현하세요.
- void push(int data)를 구현하세요.
- int pop()을 구현하세요.
(optional) 과제 5. Queue를 구현하세요.
- 배열을 사용해서 한번
- ListNode를 사용해서 한번
- 선택문
Jump: Java supports three jump statement; break, continue, return.
1. Break: In Java, break is majorly used for:
- Terminate a sequence in a switch statement.
- To exit a loop.
- Used as a "civilized" form of goto.
Using break, we can force immediate termination of a loop, bypassing the conditional expression and any remaining code in the body of loop.
Break, when used inside a set of nested loops, will only break out of the innermost loop.

https://www.geeksforgeeks.org/decision-making-javaif-else-switch-break-continue-jump/?ref=lbp 2. Continue: Sometimes it is useful to force an early iteration of a loop.
That is, you might want to continue running the loop but stop processing the remainder of the code int its body for this particular iteration.

https://www.geeksforgeeks.org/decision-making-javaif-else-switch-break-continue-jump/?ref=lbp 3. Return: The return statement is used to explicitly return from a method.
That is, it cause a program control to transfer back to the caller of the method.
- 반복문
1. while loop: A while loop is a control flow statement that allows code to be executed repeatedly based on a given Boolean condition. The while loop can be throught of as a repeating if statement.
while (boolean conditon) {
    // loop statements...
}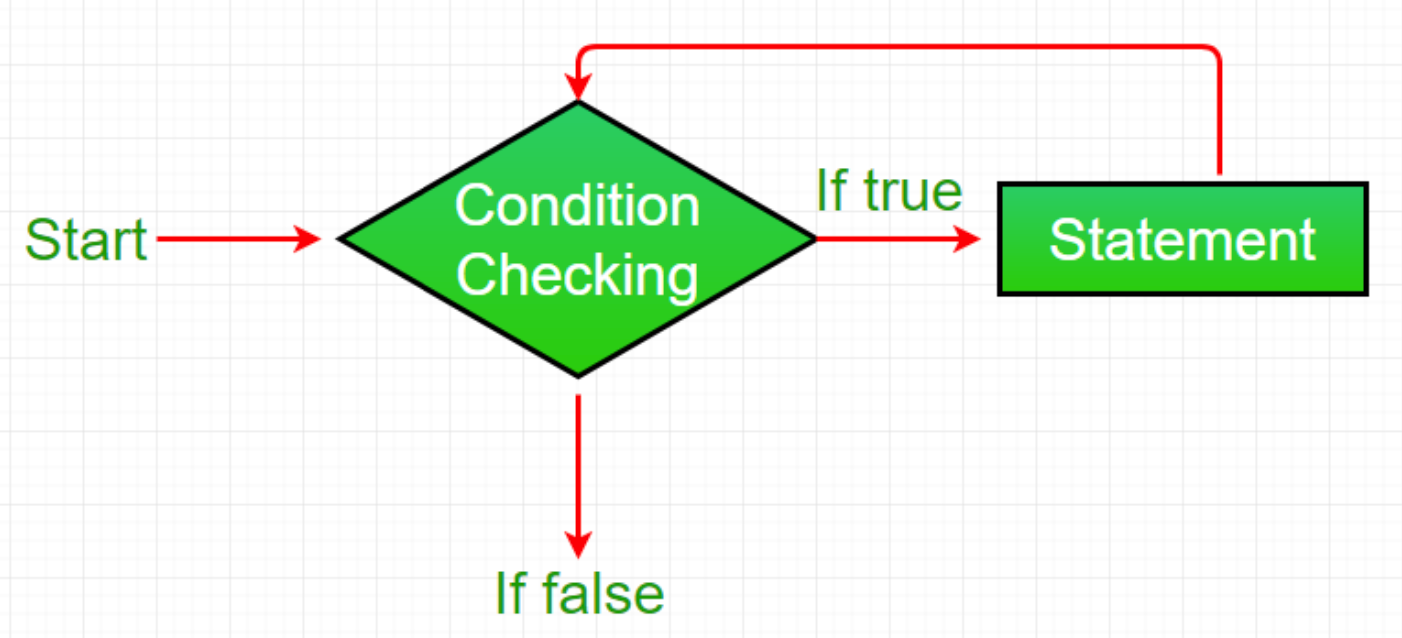
https://www.geeksforgeeks.org/loops-in-java/?ref=lbp - While loop starts with the checking of condition. If it evaluated to true, then the loop body statements are executed otherwise first statement following the loop is executed. For this reason it is also called Entry control loop.
- Once the condition is evaluated to true, the statements in the loop body are executed. Normally the statements contain an update value for the variable being processed for the next iteration.
- When the condition becomes false, the loop terminates which marks the end of its life cycle.
2. for loop: for loop provides a concise way of writing the loop structre. Unlike a while loop, a for statement consumes the initialization, condition and increment/decrement in one line thereby providing a shorter, easy to debug structure of looping.
for (initialization condition; testing condition; increment/decrement) {
    // statement(s)
}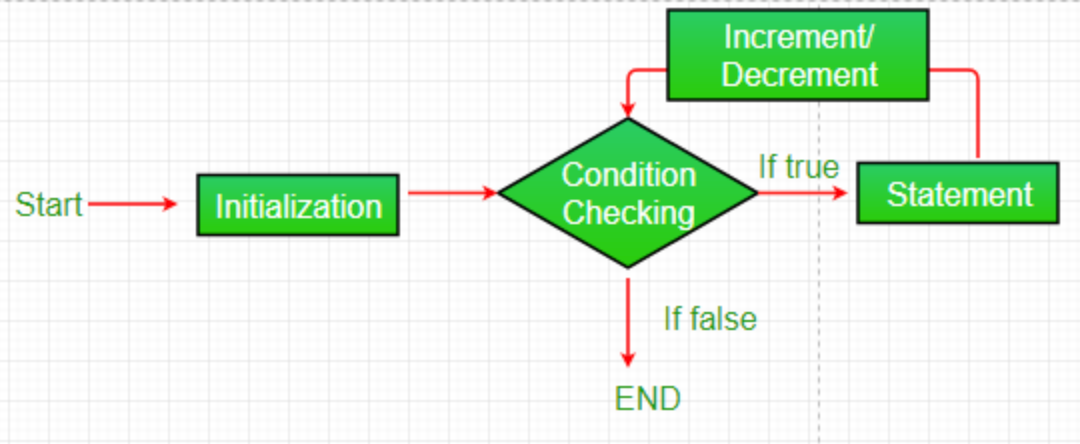
https://www.geeksforgeeks.org/loops-in-java/?ref=lbp 2-1. Enhanced for loop: Enhanced for loop provieds a simpler way to iterate through the elements of a collection or array.
It is inflexible and should be used only when there is a need to iterate through the elements in sequential manner without knowing the index of currently processed elment.
for (T element: Collection obj/array) {
    // statement(s)
}
3. do while : do while loop is similar to while loop with only difference that it checks for condition after executing the statements, and therefore is an example of Exit Control loop.
do {
    // statements...
} while (condition);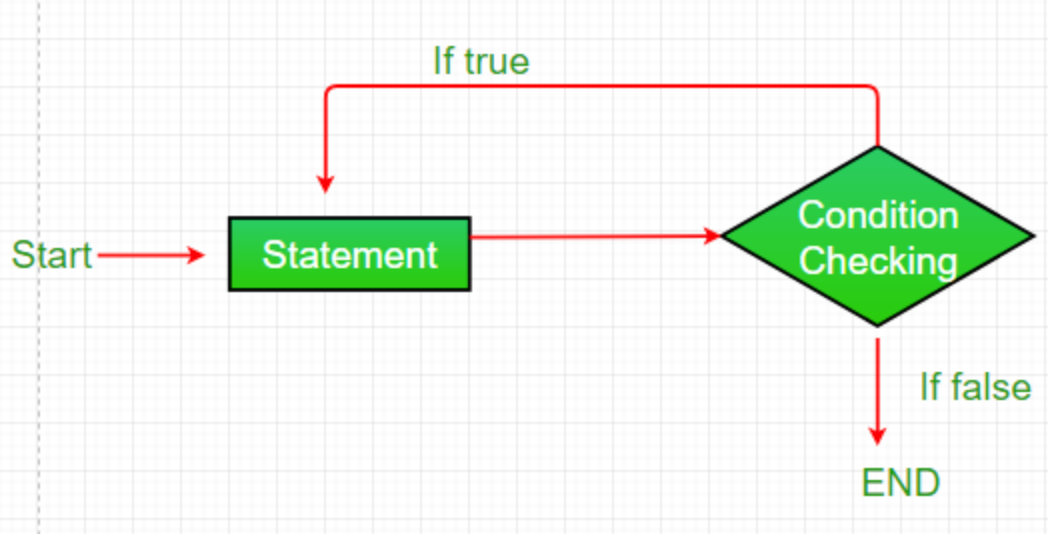
https://www.geeksforgeeks.org/loops-in-java/?ref=lbp
0. JUnit을 학습하세요.
The objective of Unit Testing:
- To isolate a section of code.
- To verify the correctness of code.
- To test every function and procedure.
- To fix bug early in development cycle and to save costs.
- To help the developers to understand the code base and enable them to make changes quickly.
- To help for code reuse.

https://www.geeksforgeeks.org/unit-testing-software-testing/ Advantages of Unit Testing:
- Unit testing allows developers to learn what functionality is provided by a unit and how to use it to gain a basic understanding of the unit API.
- Unit testing allows the programmer to refine code and make sure the module works properly.
- Unit testing enables to test parts of project without wating for others to be completed.
1. What is JUnit 5?
Unlike previous versions of JUnit, JUnit 5 is composed of several different modules from three different sub-projects.
JUnit 5 requires Java 8 (or higher) at runtime.
JUnit 5 = JUnit Platform + JUnit Jupiter + JUnit Vintage
github.com/junit-team/junit5-samples
2. Test Classes and Methods
Test Class: any top-level class, static member class, or @Nested class that contains at least one test method.
Test classes must not be abstract and must have a single constructor.
Test Method: any instance method that is directly annotated or meta-annotated with
@Test, @RepeatedTest, @ParameterizedTest, @TestFactory, or @TestTemplate.
Lifecycle Method: any method that is directly annotated or meta-annotated with
@BeforeAll, @AfterAll, @BeforeEach, or @AfterEach.
Test classes, test methods, and lifecycle methods are not required to be public, but they must not be private.
class StandardTests {

    @BeforeAll
    static void initAll() {
    }

    @BeforeEach
    void init() {
    }

    @Test
    void succeedingTest() {
    }

//    @Test
//    void failingTest() {
//        fail("a failing test");
//    }

    @Test
    @Disabled("for demonstration purposes")
    void skippedTest() {
        // not executed
    }

    @Test
    void abortedTest() {
        assumeTrue("abc".contains("Z"));
        fail("test should have been aborted");
    }

    @AfterEach
    void tearDown() {
    }

    @AfterAll
    static void tearDownAll() {
    }

}
3. Display Names
Test classes and test methods can declare custom display names via @DisplayName with spaces, special characters, and even emojis - that will be displayed in test reports and by test runners and IDEs.
@DisplayName("A special test case")
class DisplayNameDemo {

    @Test
    @DisplayName("Custom test name containing spaces")
    void testWithDisplayNameContainingSpaces() {
    }

    @Test
    @DisplayName("╯°□°)╯")
    void testWithDisplayNameContainingSpecialCharacters() {
    }

    @Test
    @DisplayName("😱")
    void testWithDisplayNameContainingEmoji() {
    }

}
4. Assertions
JUnit Jupiter comes with many of the assertion methods that JUnit 4 has and adds a few that lend tehmselves well to being used with Java 8 lamdas.
All JUnit Jupiter assertions are static methods in the org.junit.jupiter.api.Assertions class.
class AssertionsDemo {

    private final Calculator calculator = new Calculator();

    private final Person person = new Person("Jane", "Doe");

    @Test
    void standardAssertions() {
        assertEquals(2, calculator.add(1, 1));
        assertEquals(4, calculator.multiply(2, 2),
                "The optional failure message is now the last parameter");
        assertTrue('a' < 'b', () -> "Assertion messages can be lazily evaluated -- "
                + "to avoid constructing complex messages unnecessarily.");
    }

    @Test
    void groupedAssertions() {
        // In a grouped assertion all assertions are executed, and all
        // failures will be reported together.
        assertAll("person",
            () -> assertEquals("Jane", person.getFirstName()),
            () -> assertEquals("Doe", person.getLastName())
        );
    }

    @Test
    void dependentAssertions() {
        // Within a code block, if an assertion fails the
        // subsequent code in the same block will be skipped.
        assertAll("properties",
            () -> {
                String firstName = person.getFirstName();
                assertNotNull(firstName);

                // Executed only if the previous assertion is valid.
                assertAll("first name",
                    () -> assertTrue(firstName.startsWith("J")),
                    () -> assertTrue(firstName.endsWith("e"))
                );
            },
            () -> {
                // Grouped assertion, so processed independently
                // of results of first name assertions.
                String lastName = person.getLastName();
                assertNotNull(lastName);

                // Executed only if the previous assertion is valid.
                assertAll("last name",
                    () -> assertTrue(lastName.startsWith("D")),
                    () -> assertTrue(lastName.endsWith("e"))
                );
            }
        );
    }

    @Test
    void exceptionTesting() {
        Exception exception = assertThrows(ArithmeticException.class, () ->
            calculator.divide(1, 0));
        assertEquals("/ by zero", exception.getMessage());
    }

    @Test
    void timeoutNotExceeded() {
        // The following assertion succeeds.
        assertTimeout(ofMinutes(2), () -> {
            // Perform task that takes less than 2 minutes.
        });
    }

    @Test
    void timeoutNotExceededWithResult() {
        // The following assertion succeeds, and returns the supplied object.
        String actualResult = assertTimeout(ofMinutes(2), () -> {
            return "a result";
        });
        assertEquals("a result", actualResult);
    }

    @Test
    void timeoutNotExceededWithMethod() {
        // The following assertion invokes a method reference and returns an object.
        String actualGreeting = assertTimeout(ofMinutes(2), AssertionsDemo::greeting);
        assertEquals("Hello, World!", actualGreeting);
    }

    @Test
    void timeoutExceeded() {
        // The following assertion fails with an error message similar to:
        // execution exceeded timeout of 10 ms by 91 ms
        assertTimeout(ofMillis(10), () -> {
            // Simulate task that takes more than 10 ms.
            Thread.sleep(100);
        });
    }

    @Test
    void timeoutExceededWithPreemptiveTermination() {
        // The following assertion fails with an error message similar to:
        // execution timed out after 10 ms
        assertTimeoutPreemptively(ofMillis(10), () -> {
            // Simulate task that takes more than 10 ms.
            new CountDownLatch(1).await();
        });
    }

    private static String greeting() {
        return "Hello, World!";
    }

}
5. Assumptions
class AssumptionsDemo {

    private final Calculator calculator = new Calculator();

    @Test
    void testOnlyOnCiServer() {
        assumeTrue("CI".equals(System.getenv("ENV")));
        // remainder of test
    }

    @Test
    void testOnlyOnDeveloperWorkstation() {
        assumeTrue("DEV".equals(System.getenv("ENV")),
                () -> "Aborting test: not on developer workstation");
        // remainder of test
    }

    @Test
    void testInAllEnvironments() {
        assumingThat("CI".equals(System.getenv("ENV")),
                () -> {
                    // perform these assertions only on the CI server
                    assertEquals(2, calculator.divide(4, 2));
                });

        // perform these assertions in all environments
        assertEquals(42, calculator.multiply(6, 7));
    }

}
6. Disabling Tests
Entire test classes or individual test methods may be disabled via the @Disabled annotation, via one of the annotations discussed in Conditional Test Execution, or via a custom ExecutionCondition.
@Disabled may be declared without providing a reason; however, the JUnit teeam recommends that developers provide a short explanation for why a test class or test method has been disabled.
@Disabled("Disabled until bug #99 has been fixed")
public class DisabledClassDemo {

    @Test
    void testWillBeSkipped() {
    }

}
class DisabledTestsDemo { @Disabled("Disabled until bug #42 has been resolved") @Test void testWillBeSkipped() { } @Test void testWillBeExecuted() { } }7. Tagging and Filtering
Test classes and methods can be tagged via the @Tag annotaion.
Those tage can later be used to filter test discover and execution.
@Tag("fast")
@Tag("model")
class TaggingDemo {

    @Test
    @Tag("taxes")
    void testingTaxCalculation() {
    }

}
8. Meta-Annotations and Composed Annotations
JUnit Jupiter annotations can be used as meta-annotations. That means that you cna define your own composed annotation that will automatically inherit the semantics of its meta-annotations.
@Target({ ElementType.TYPE, ElementType.METHOD })
@Retention(RetentionPolicy.RUNTIME)
@Tag("fast")
public @interface Fast {
}
@Fast @Test void myFastTest() { // ... }@Target(ElementType.METHOD) @Retention(RetentionPolicy.RUNTIME) @Tag("fast") @Test public @interface FastTest { }@FastTest void myFastTest() { // ... }9. Test Execution Order
By default, test methods will be ordered using an algorithm that is deterministic but intentionally nonobvious.
- DisplayName: sorts test methods alphanumerically based on their display names
- MethodName: sorts test methods alphanumerically based on their method name and formal parameter lists.
- OrderAnnotation: sorts test methods numerically based on values specified via the @Order annotaion.
- Random: orders test methods pseudo-randomly and supports configuration of a custom seed.
@TestMethodOrder(OrderAnnotation.class)
class OrderedTestsDemo {

    @Test
    @Order(1)
    void nullValues() {
    }

    @Test
    @Order(2)
    void emptyValues() {
    }

    @Test
    @Order(3)
    void validValues() {
    }
}
10. Nested Tests
@Nested tests give the test writer more capabilities to express the relationship among several groups of tests.
@DisplayName("A stack")
class TestingAStackDemo {

    Stack<Object> stack;

    @Test
    @DisplayName("is instantiated with new Stack()")
    void isInstantiatedWithNew() {
        new Stack<>();
    }

    @Nested
    @DisplayName("when new")
    class WhenNew {

        @BeforeEach
        void createNewStack() {
            stack = new Stack<>();
        }

        @Test
        @DisplayName("is empty")
        void isEmpty() {
            assertTrue(stack.isEmpty());
        }

        @Test
        @DisplayName("throws EmptyStackException when popped")
        void throwsExceptionWhenPopped() {
            assertThrows(EmptyStackException.class, stack::pop);
        }

        @Test
        @DisplayName("throws EmptyStackException when peeked")
        void throwsExceptionWhenPeeked() {
            assertThrows(EmptyStackException.class, stack::peek);
        }

        @Nested
        @DisplayName("after pushing an element")
        class AfterPushing {

            String anElement = "an element";

            @BeforeEach
            void pushAnElement() {
                stack.push(anElement);
            }

            @Test
            @DisplayName("it is no longer empty")
            void isNotEmpty() {
                assertFalse(stack.isEmpty());
            }

            @Test
            @DisplayName("returns the element when popped and is empty")
            void returnElementWhenPopped() {
                assertEquals(anElement, stack.pop());
                assertTrue(stack.isEmpty());
            }

            @Test
            @DisplayName("returns the element when peeked but remains not empty")
            void returnElementWhenPeeked() {
                assertEquals(anElement, stack.peek());
                assertFalse(stack.isEmpty());
            }
        }
    }
}
11. Repeated Tests
JUnit Jupiter provides the ability to repeat a test a specified number of times by annotating a method with @RepeatedTest and specifying the total number of repetitions desired. Each invocation of repeated test behaved like the execution of a regular @Test method with full support for the same lifecycle callbacks and extensions.
class RepeatedTestsDemo {
    private Logger logger = // ...

    @BeforeEach
    void beforeEach(TestInfo testInfo, RepetitionInfo repetitionInfo) {
        int currentRepetition = repetitionInfo.getCurrentRepetition();
        int totalRepetitions = repetitionInfo.getTotalRepetitions();
        String methodName = testInfo.getTestMethod().get().getName();
        logger.info(String.format("About to execute repetition %d of %d for %s", //
            currentRepetition, totalRepetitions, methodName));
    }

    @RepeatedTest(10)
    void repeatedTest() {
        // ...
    }
 }

/*
INFO: About to execute repetition 1 of 10 for repeatedTest
INFO: About to execute repetition 2 of 10 for repeatedTest
INFO: About to execute repetition 3 of 10 for repeatedTest
INFO: About to execute repetition 4 of 10 for repeatedTest
INFO: About to execute repetition 5 of 10 for repeatedTest
INFO: About to execute repetition 6 of 10 for repeatedTest
INFO: About to execute repetition 7 of 10 for repeatedTest
INFO: About to execute repetition 8 of 10 for repeatedTest
INFO: About to execute repetition 9 of 10 for repeatedTest
INFO: About to execute repetition 10 of 10 for repeatedTest
*/
12. Parameterized Tests
Parameterized tests make it possible to run a test multiple times with different arguments.
They are declared just like regular @Test methods but use the @ParameterizedTest annotation instead.
In addition, you must declare at least one source that wil provide the arguments for each invocation and then consume the arguments in the test method.
@ParameterizedTest
@ValueSource(strings = { "racecar", "radar", "able was I ere I saw elba" })
void palindromes(String candidate) {
    assertTrue(StringUtils.isPalindrome(candidate));
}
@ParameterizedTest @ValueSource(ints = { 1, 2, 3 }) void testWithValueSource(int argument) { assertTrue(argument > 0 && argument < 4); }@ParameterizedTest @NullAndEmptySource @ValueSource(strings = { " ", " ", "\t", "\n" }) void nullEmptyAndBlankStrings(String text) { assertTrue(text == null || text.trim().isEmpty()); }@ParameterizedTest @CsvSource({ "apple, 1", "banana, 2", "'lemon, lime', 0xF1" }) void testWithCsvSource(String fruit, int rank) { assertNotNull(fruit); assertNotEquals(0, rank); }
1. live-study 대시 보드를 만드는 코드를 작성하세요.
1234567891011121314151617181920212223242526272829303132333435363738394041import org.kohsuke.github.*;import java.io.*;;import java.util.*;public class Application {private static final String token = "token";public static void main(String[] args) throws IOException {GitHub github = new GitHubBuilder().withOAuthToken(token).build();GHRepository ghRepository = github.getRepository("whiteship/live-study");Map<String, Integer> participant = new HashMap<>();List<GHIssue> issues = ghRepository.getIssues(GHIssueState.ALL);for (GHIssue issue : issues) {List<GHIssueComment> commentList = issue.getComments();Set<String> nameList = new HashSet<>();for (GHIssueComment ghIssueComment : commentList) {nameList.add(ghIssueComment.getUser().getLogin());}for (String s : nameList) {if (!participant.containsKey(s)) {participant.put(s, 1);} else {Integer integer = participant.get(s);participant.put(s, integer + 1);}}}participant.forEach((key, value) -> {double percent = (double) (value * 100) / 18;System.out.println(key + " : " + String.format("%.2f", percent) + "%");});}}cs
2. LinkedList를 구현하세요.
123456789101112131415161718192021222324252627282930313233343536373839404142434445464748495051525354555657585960616263646566676869707172737475767778798081828384858687888990919293949596979899100101102103104105106107108109110111public class MyLinkedList {public ListNode head = null;public int size = 0;public void addFirst(int item) {ListNode newListNode = new ListNode(item);newListNode.next = head;head = newListNode;size++;}public void addAfter(ListNode before, int item) {ListNode newListNode = new ListNode(item);newListNode.next = before.next;before.next = newListNode;size++;}// 연결리스트의 index번째 위치에 새로운 데이터를 삽입한다.public void add(int index, int item) {if (index < 0 || index > size) {return; // 추후에 throw}if (index == 0) {addFirst(item);} else {ListNode ListNode = getListNode(index - 1);addAfter(ListNode, item);}}public int removeFirst() {if (head == null) {return -1;} else {int temp = head.data;head = head.next;size--;return temp; // 삭제된 데이터 리턴}}public int removeAfter(ListNode before) {if (before.next == null) {return -1;} else {int temp = before.next.data;before.next = before.next.next;size--;return temp; // 삭제된 데이터 리턴}}// index 번째 노드를 삭제하고, 그 노드에 저장된 데이터 반환public int remove(int index) {if (index < 0 || index >= size) {return -1;} else if (index == 0) {return removeFirst();} else {ListNode prev = getListNode(index - 1);return removeAfter(prev);}}// 연결리스트의 index번째 노드의 주소를 반환한다 .public ListNode getListNode(int index) {if (index < 0 || index >= size) {return null;}ListNode p = head;for (int i = 0; i < index; i++) {p = p.next;}return p;}// index번째 노드에 저장된 데이터를 반환한다.public int get(int index) {if (index < 0 || index >= size) {return -1;}ListNode p = head;for (int i = 0; i < index; i++) {p = p.next;}return p.data;}public boolean contains(ListNode head, ListNode nodeToCheck) {while (head != null) {if (head.data == nodeToCheck.data) {return true;}head = head.next;}return false;}}class ListNode {public int data;public ListNode next;public ListNode(int data) {this.data = data;}}cs
3. Stack을 구현하세요.
1234567891011121314151617181920212223242526272829303132333435public class MyStack {public int top = 0;public int size = 10;public int[] arr;public MyStack() {arr = new int[size];}public MyStack(int size) {this.size = size;arr = new int[size];}public void push(int data) {if (top > size) {throw new StackOverflowError();}arr[top++] = data;size++;}public int pop() {if (top <= 0) {throw new EmptyStackException();}return arr[--top];}public boolean isEmpty() {return top <= 0;}}cs 4. 앞서 만든 ListNode를 사용해서 Stack을 구현하세요.
12345678910111213141516171819202122232425262728293031323334353637383940class MyListNodeStack {public ListNode push(ListNode head, ListNode nodeToAdd) {ListNode node = head;if (node == null) {return nodeToAdd;}while (node.next != null) {node = node.next;}node.next = nodeToAdd;return head;}public int size(ListNode head) {ListNode node = head;int size = 1;while (node.next != null) {node = node.next;size++;}return size;}public ListNode pop(ListNode head) {int positionToRemove = size(head) - 1;ListNode node = head;ListNode delNode;if (positionToRemove == 0) {head = head.next;delNode = head;} else {for (int i = 0; i < positionToRemove - 1; i++) {node = node.next;}delNode = node.next;node.next = node.next.next;}return delNode;}}cs
※ 출처
junit.org/junit5/docs/current/user-guide
lob-dev.tistory.com/entry/Live-StudyWeek-04-제어문-과제
kils-log-of-develop.tistory.com/349
※ 스터디
'Java' 카테고리의 다른 글
6. 상속 (0) 2020.12.23 5. 클래스 (0) 2020.12.19 3. 연산자 (0) 2020.11.28 2. 자바 데이터 타입, 변수 그리고 배열 (0) 2020.11.25 1. JVM은 무엇이며 자바 코드는 어떻게 실행하는 것인가 (0) 2020.11.11